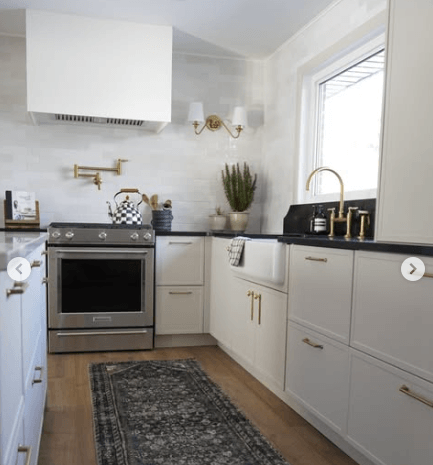
Toonny Vision has been hard at work transforming her 1970s farmhouse, and now, eight weeks into living there, she and her husband are tackling one of the most important projects—the kitchen. With only 200 square feet to work with, the goal is to create a space that’s functional, modern, and true to the farmhouse’s character. Let’s dive into the journey they’ve taken so far, including the challenges and the exciting progress they’ve made, all while working primarily with DIY methods.
Week 1: Rearranging, Demo, and Planning
In the first week, Toonny and her husband started by rearranging the furniture in their temporary kitchen setup, where their fridge now lives in the dining room. A family member lent them a trailer, which came in handy for disposing of the old cabinets and their first bulkhead. With the help of a friend, they began mapping out the electrical work—a key part of modernizing the kitchen.

Week 2: Removing the Peninsula and Expanding the Space
Week two was all about demolition. They removed the peninsula and the bulkhead, and got started on the electrical, which involved making tough decisions about where to put the switches. Her husband, Jeff, took on the task of cutting down part of a wall to open up the kitchen further. What started as a small project turned into a 12-foot opening, bringing in more light and space. Luckily, the wall wasn’t load-bearing, making the expansion smoother and quicker than expected.

Week 3 & 4: Sealing the Opening and Tackling the Kitchen
After creating the 12-foot opening, they sealed it back up temporarily to refocus on the kitchen itself. During this time, they also had their roof redone and roughed in their range hood. With everything laid out, they could visualize how much backsplash they’d need and finished removing the old tile. The stove was relocated to the shop, and they got to work on the flooring, only to discover that the original wooden paneling was in worse condition than expected. They tore it up and disposed of 500 pounds of tile at the dump. Talk about hard work!

Week 5 & 6: Electrical Work and Wall Finishing
As the renovation moved into weeks five and six, they decided to close off the opening between the family room and kitchen. Adam, a friend, returned to do more electrical work. One challenge was matching old wall finishes with new ones, especially in an older farmhouse. They used plywood to build out the wall, finishing it with drywall, which led to late nights cutting, assembling, and creating a mosaic-like effect on the ceiling. By the end of the week, they finally got to the mudding stage and scored a great deal on their backsplash tile through Marketplace—a big win before heading off for a short vacation.

Week 7 & 8: Mudding, Drywalling, and Cabinet Prep
After their vacation, Toonny and her husband got back to work, focusing on drywalling and mudding. They used a handy hack with toothpaste to cut out outlets—a game changer! They finished patching up holes and got excited about their cabinet delivery, which was expected later that week. The goal was to finish the kitchen walls and prep for the cabinets.

Week 10: Cabinet Delivery and Installation
The kitchen cabinets finally arrived in week 10, but there was still plenty to do before installation could begin. After priming the kitchen walls and clearing out the shop, they were ready to handle the 2,000 pounds of cabinets they had opted for. Originally, they planned to go with IKEA but decided to upgrade to Kitch. Toonny noted that building the cabinets was surprisingly one of the easier parts of the renovation. Everything fit perfectly, and they finished the cabinet assembly just in time for a special 40th birthday celebration.

Weeks 11 to 13: Details and Finishing Touches
As the renovation entered its final stages, they tackled the finishing touches. The farmhouse sink installation was a bit tricky, but they secured it and started installing the base cabinets. Toonny finally chose the height for the pot filler and prepped for installation. The hardest decision turned out to be the flooring, but they settled on a floating laminate. With everything roughed in, they called in professionals to measure for the countertops.

The journey continues as they wrap up their DIY farmhouse kitchen renovation. Stay tuned for more exciting updates on the transformation!

Weeks 14 to 15: Final Update
Once the countertops were installed, things progressed really quick. Luckily the install went smooth and they were able to even get a brand new dishwasher, stove and mood lighting above the hood range installed. Meanwhile, Toonny was busy building the upper Kitch boxes which according to her was "actually really easy" and the "hardest part was choosing a cabinet front, there was so many to choose from but we ended up going with their Shaker Slender."

The next big decision was where to place the hardware (handles, knobs). They painted the walls and then got to tiling. They tiled all the way to the ceiling and it made a big impact on the space.
__________________________________________
This renovation is a perfect example of how Kitch cabinetry can fit seamlessly into any space—even a 1970s farmhouse kitchen! Whether you're doing it yourself or working with professionals, our customizable options make every step easier.
Finished Kitchen

